
A transaction monitor replays a recorded browser journey on a schedule: log in, search, check out. It fails the run the moment one step cannot complete. Most of the failures that turn out to be false trace back to one cause: a step acting on a page that was not ready for it. For the editor tour and the full action catalog, see Transaction Monitoring; if a flow is already failing, start at Why a Transaction Check Fails.
Before You Start
- Transaction monitors draw on the Advanced checks pool, shared with Speed monitors: Free 0, Basic 1, Professional 10, Enterprise 100. The trial gets 50.
- You need the Editor, Admin or Owner role to create or edit a monitor.
Action Groups
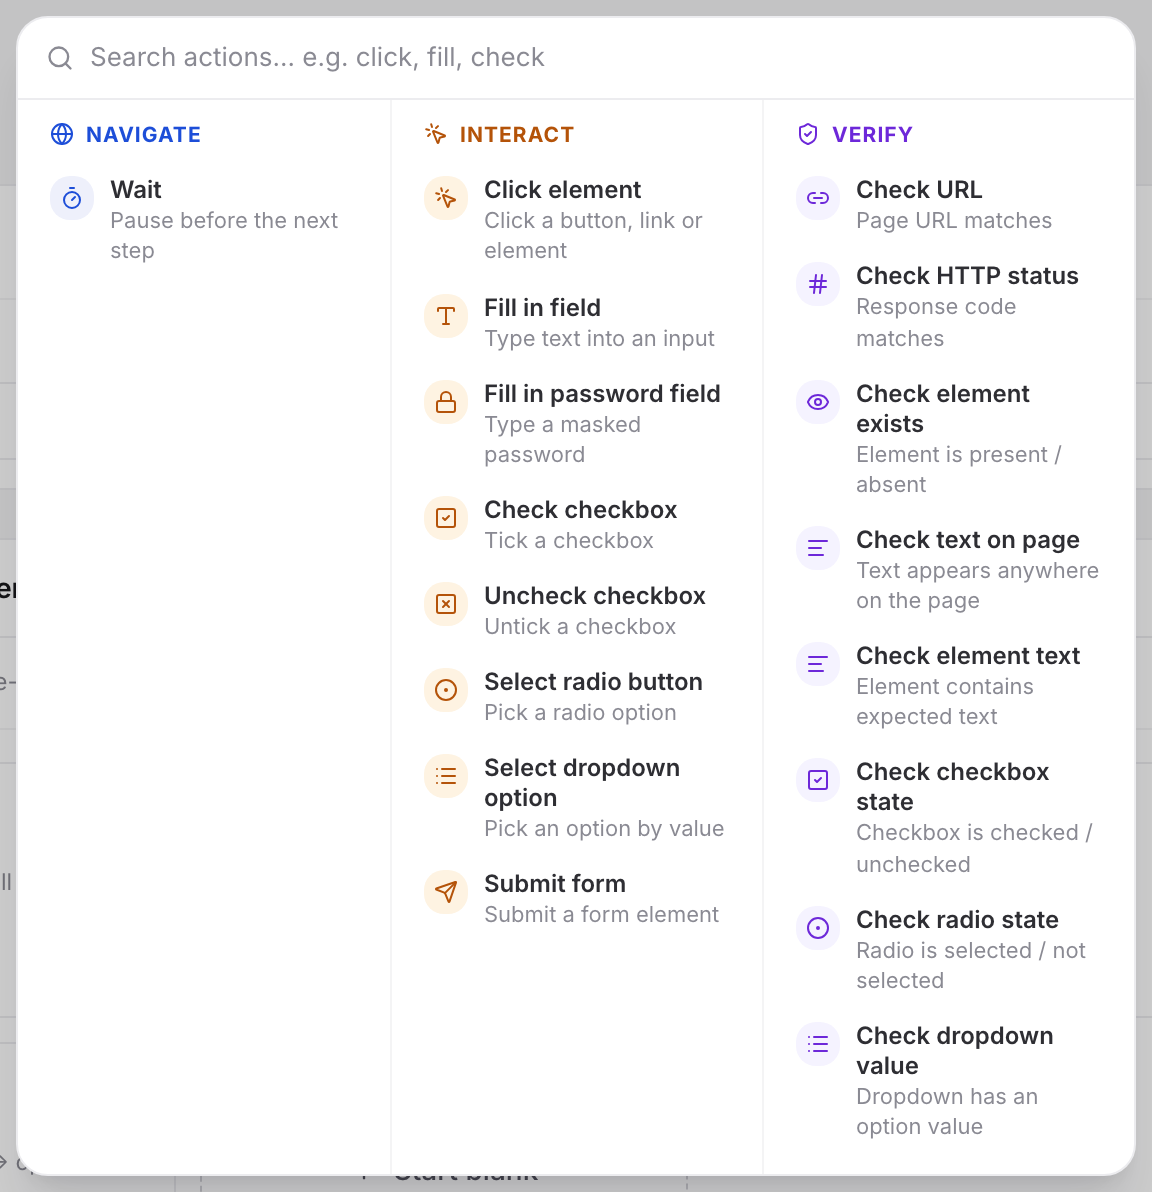
Every step is one action, picked from a searchable list with three headings.
| Group | Actions |
|---|---|
| Navigate | Wait (Go to URL is fixed on step 1 and is not offered in the picker) |
| Interact | Click element, Fill in field, Fill in password field, Check checkbox, Uncheck checkbox, Select radio button, Select dropdown option, Submit form |
| Verify | Check URL, Check HTTP status, Check element exists, Check text on page, Check element text, Check checkbox state, Check radio state, Check dropdown value |
Wait is the only action under Navigate. Step 1 is always Go to URL, the step that opens the page and starts the browser session. The picker never offers Go to URL to any other step.
Choosing Selectors That Survive a Deploy
Every Interact action and most Verify actions take a CSS Selector. A selector that matches today and misses after your next release is the most common cause of a flow that breaks for no visible reason.
- Prefer stable attributes. An
id, aname, or a dedicateddata-*attribute added for testing. These survive restyling. - Avoid generated class names and long paths. Utility-CSS classes and build-tool hashes change on every rebuild. So does a selector built from a chain of
div > div:nth-child(4). - Never select on a value that changes per run. An order number, a timestamp, a session token, a price. It matches on the run you built it and fails on the next.
- Re-check the flow after a front-end change. Open the monitor, run the steps, and confirm each one still resolves its element.
Picking a Selector From the Live Page
With a builder session open, each selector field has a Suggest button. It reads the page the session is on and lists the candidates that fit the step's action. A filter box matches both the selector and the element description, so typing submit narrows a long list without a re-read. Enter applies the top match.
With no session yet, the popover offers "Run steps 1–N to load your page and fetch suggestions". Click it and the builder runs the earlier steps first.
Giving a Step Enough Time
A step that runs before the page has settled is the second big source of intermittent failure. Two controls address it:
| Control | Where it lives | What it does | Limits |
|---|---|---|---|
| Wait (action) | A step of its own, in the Navigate group | Pauses the flow for a fixed duration in the step's Duration (ms) field | Whole milliseconds only |
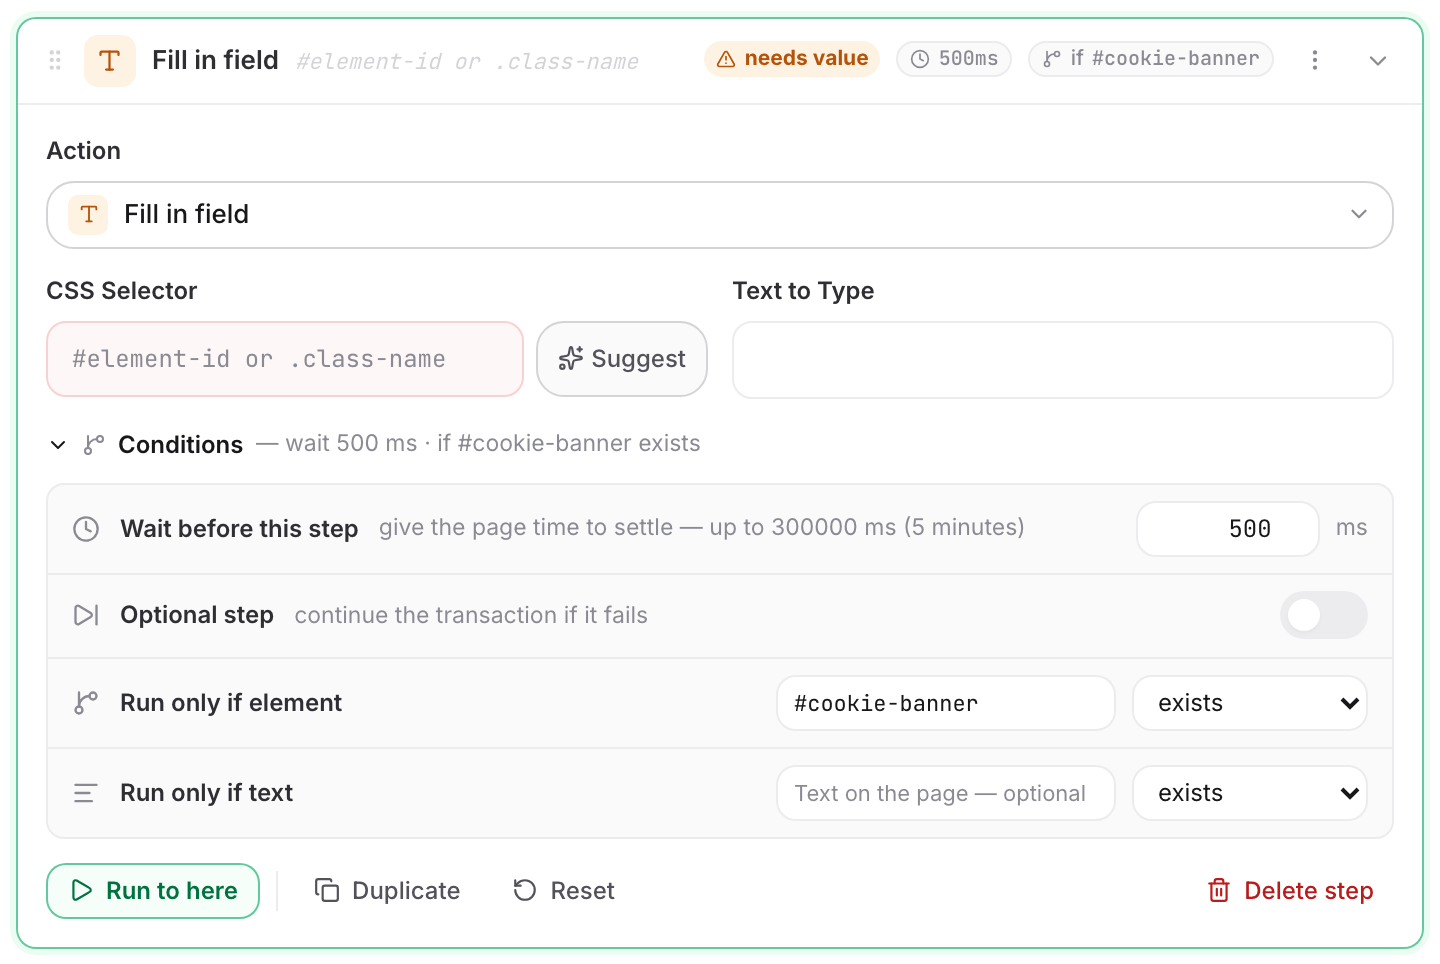
| Wait before this step | The Conditions disclosure on steps 2 and later | Delays only that step, without adding a row to the flow | 0–300,000 ms (5 minutes), clamped when you save |
Use a Wait step when a whole page transition needs breathing room. Use Wait before this step when one element is the slow one: a modal that animates in, a field a script enables late.
A wait has a ceiling. The probe abandons a step as a timeout after 20 retries, or after 30 seconds stuck on it. Both the editor field and the save clamp a pre-step wait down to 300,000 ms. A step that needs more patience than that has the wrong target: pick a different element, or add a Verify step on something that appears earlier in the same transition.
Handling Optional and Conditional Elements
Cookie banners, promo modals and "are you still there?" prompts appear on some runs and not others, so a step that targets one of them fails on every run where it is absent. The controls that fix it live in the Conditions disclosure, closed by default on steps 2 and later.
| Control | What it does |
|---|---|
| Optional step | Continues the transaction if this step fails, instead of failing the whole run |
| Run only if element | Runs this step only when a CSS selector you give exists or does not exist |
| Run only if text | Runs this step only when text you give exists or does not exist on the page |
| Wait before this step | Delays this step alone by up to 300,000 ms (5 minutes) |
For a cookie banner, put the dismiss click behind Run only if element on the banner's own selector. That is more precise than Optional step, because it distinguishes "the banner was not there" from "the click failed". Dismiss overlays early, then target the control you need underneath.
Ending on a Verify Step, Never on a Click
A Click element step that succeeds proves the click landed and nothing about what the page did next. Many failure pages still report success to the browser (HTTP 200) and put the error in the page text: "invalid password", "item out of stock", "session expired". A flow that ends on a click then records a false success.
Finish every flow on a Verify action for something that exists only when the journey truly succeeded. Use Check element exists on a dashboard heading or account menu, or Check text on page on an order-confirmation message. Add one after each critical transition too.
What the Engine Already Handles
- Links and buttons that open a new tab. Before every Click element and Submit form, the engine forces every element that would open a new tab (
target="_blank") to open in the same tab instead (target="_self"). The navigation stays in the session's tab. Only a popup opened by JavaScript still escapes. - Elements below the fold. The engine scrolls the matched element into view before it clicks, fills or checks it. A target low on the page needs no extra step.
Starting From a Recipe
When you create a transaction monitor the builder offers four skeletons: Login flow, Signup form, Site search and Checkout. Each one pre-fills an ordered set of empty steps, so you fill in selectors rather than assemble the shape by hand. Transaction Monitoring lists what each one lays out.
A recipe is a starting shape only; every selector and value arrives empty and the monitor will not save until you fill them.
Login and Checkout Specifics
- Put the password in Fill in password field, not Fill in field. The field is masked as you type, and the step tables on the monitor and incident pages print
********in place of the value. Uptimia stores the password so the run can replay the login, and it loads back into the editor. Use an account created for monitoring, never a real one. - Long email addresses are a known source of half-filled fields. Give the fill step a Wait before this step value, then verify with Check element text before you submit.
- For checkout, use a dedicated test account and a sandbox payment path so a monitor run does not place a real order.
- After each page transition (cart, shipping, payment, confirmation), give the next step time before it touches a field.
Testing as You Build
The builder runs your steps against a real browser session on a probe, so you can fix a selector and retry without saving. The run controls and the Test from probe selector are described in Transaction Monitoring.
Every tested step captures a screenshot, which catches what a green result hides: a banner over a button, a field that filled halfway. Run step acts on the page as it is right now. A step that already dismissed a banner or submitted a form cannot find its target a second time, so reload from step 1 before you trust a retry.
Where the builder tests from has no bearing on the saved monitor: that runs from the probes you pick on the Locations tab, or from the location profile attached to it.
Rules That Block a Save
The editor refuses to save a flow it knows cannot run, and names the step at fault:
- Step 1 must be Go to URL.
- Every step needs its primary value.
- A Wait duration must be whole digits.
- Check HTTP status takes a code between 100 and 599.
The exact wording of each message is in Transaction Monitoring. A monitor also needs at least one alert recipient before it saves, in both alerting modes.
Choosing the Check Interval
A browser run is heavier than an HTTP request, so the cadence is slower and the same on every plan: no more often than every 10 minutes, defaulting to every 30 minutes, up to every 24 hours. Pick the interval from how quickly you need to know about a broken journey, rather than from the fastest setting the frequency slider offers.