
Uptimia posts downtime and recovery alerts into a Discord channel through a channel webhook. You add Discord as an integration, which creates a matching contact, and you then route monitors to that contact, directly or through a group row or an escalation step. Retries, grouped digests and the outbound URL check work the same on every channel. Integrations Overview covers all three.
Before You Start
- You need the Manage Webhooks permission on the Discord server that should receive alerts.
- In Uptimia you must be Owner or Admin: only those roles see Alerting → Integrations.
- Treat the webhook URL as a credential. Anyone holding it can post into that channel.
Step 1: Create the Discord Webhook
You pick the destination channel here, in Discord. Uptimia has no channel field.
- Click the server name at the top of the channel list and select Server Settings.
- Open Integrations and click Create Webhook, or open an existing one.
- Set Channel to the one alerts should appear in.
- Click Copy Webhook URL. It starts with
https://discord.com/api/webhooks/.
Step 2: Add the Discord Integration in Uptimia
- Go to Alerting → Integrations and click Add Integration.
- Select Discord in the 1. Select Integration Type grid. A setup panel opens with the same Discord steps, each with a Show screenshot link.
- Enter an Integration Name that names the destination, such as "Production alerts – #ops".
- Paste the URL into Webhook URL.
- Click Save Integration. Uptimia creates a Discord contact of the same name, already confirmed.
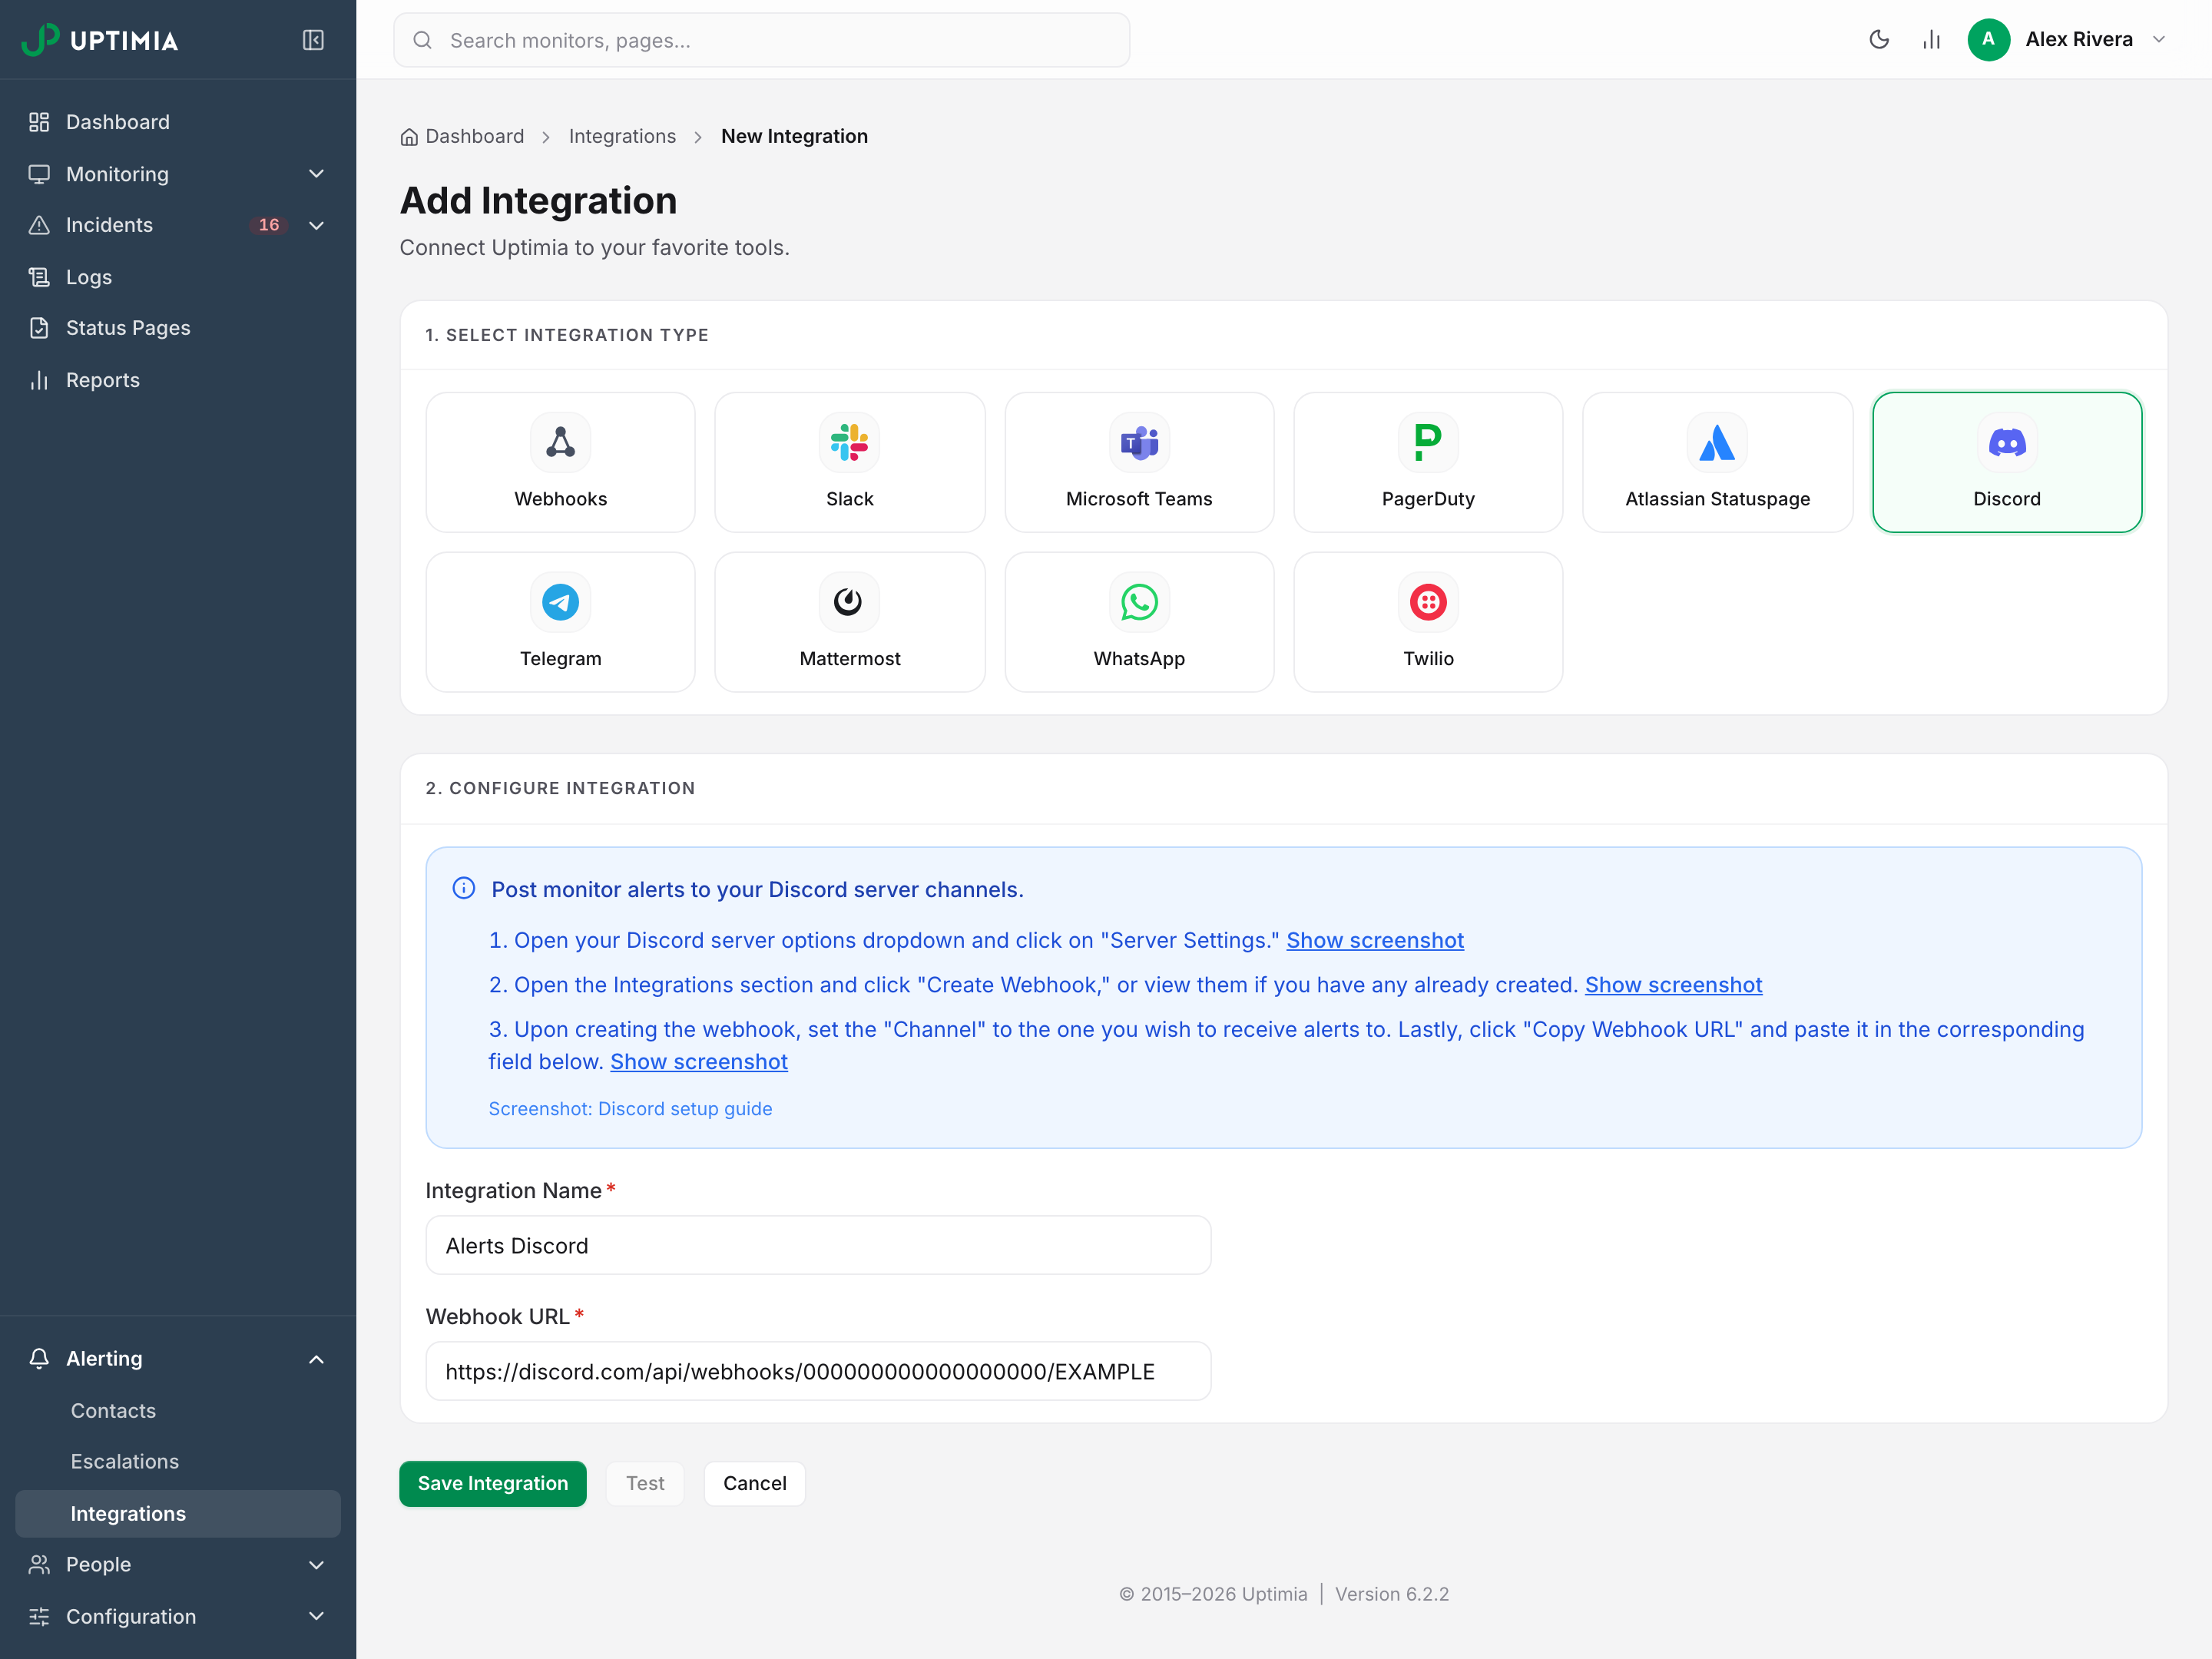
Uptimia accepts a Discord webhook only over HTTPS on discord.com or discordapp.com, subdomains included. Uptimia refuses anything else at save time. On a new integration the message reads The integration is missing required fields; on an existing one it reads There was an error updating the integration. Uptimia catches a blank field earlier and flags it on the field itself: the Webhook URL shows This field is required, and the name shows Integration name is required. So if Save is refused while both fields look filled in, the URL is not a Discord webhook URL.
Step 3: Route Monitors to the Discord Contact
- Open the monitor and choose Edit from its actions menu (the three dots).
- Scroll to the Alerting card at the bottom of the Main tab.
- Select the Discord contact in the left pane. The right pane lists every address and channel that will receive the alert.
- Click Save Monitor.
One contact can serve as many monitors as you like.
On a single-user account, a monitor set to the auto-include row All my contacts — current & future picks up the new Discord contact with no per-monitor edit. Add a second person or any team, and People and Contacts groups replace that row. Creating a team adds a Teams group as well. Ticking your own person row in those groups does the same job. An escalation policy can name the contact in one of its steps instead. See Who Gets Alerted.
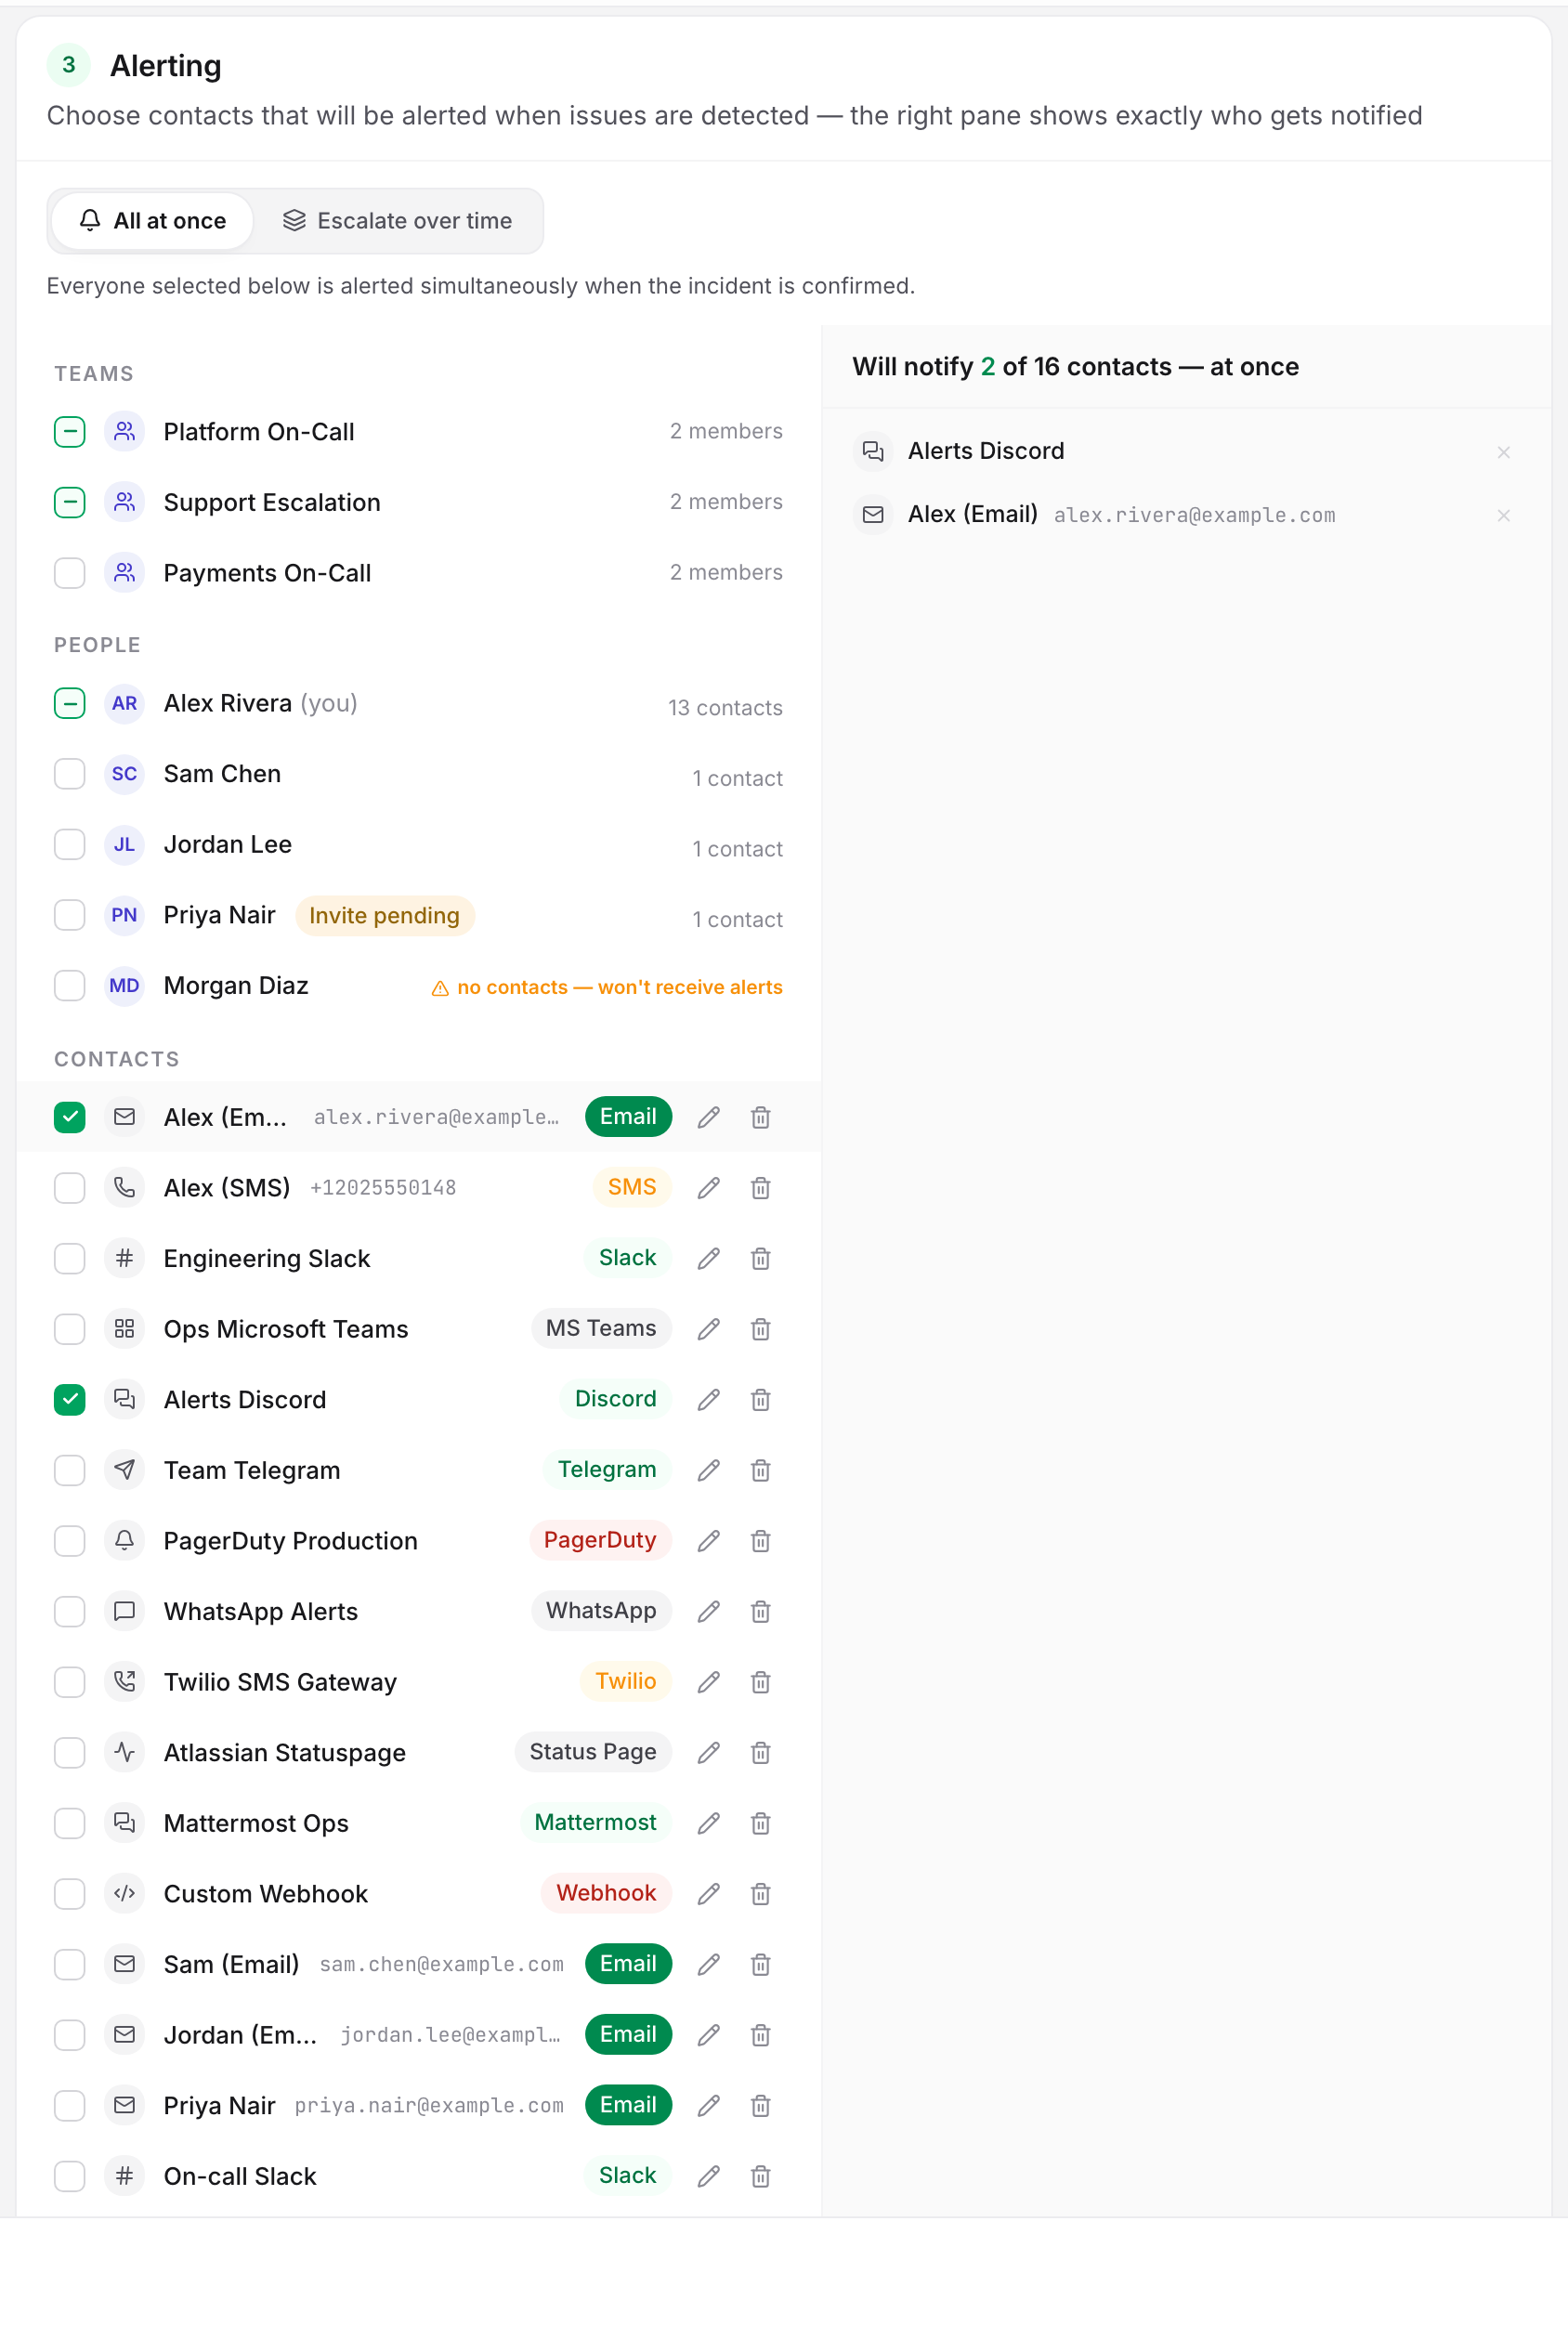
While the monitor is set to Escalate over time, the escalation policy decides who is paged, not the list you just ticked. Add the Discord contact to a step of that policy. The monitor's own list stays required as the fallback for when the grouping and escalation layers cannot take the incident. If a whole ladder reaches nobody, Uptimia pages the account owner as a last resort. See Escalation Policies.
Test It
From Alerting → Integrations, open the actions menu (three dots) on the Discord row and select Test. Uptimia posts a "your Discord Channel has been connected to Uptimia" confirmation through the same webhook URL live alerts use, then shows Test notification sent successfully. That message only means Uptimia sent the request. Uptimia does not report Discord's answer, so the confirmation appearing in your channel is the only proof the webhook still works.
The editor has a Test button too. It tests the saved row, so it works in edit mode only; with unsaved edits the button is disabled and the page reads Save your changes to test the updated configuration. Save before testing.
What a Discord Alert Looks Like
Alerts arrive as embeds posted by a webhook user named Uptimia, color-coded and headed by severity:
| Heading | Color | When |
|---|---|---|
| Down | Red | A confirmed critical incident opened |
| Trouble | Amber | The monitor is degraded but not fully down |
| Recovered | Green | The monitor came back up |
| Test notification | Blurple | You sent a test |
Each embed carries the alert text plus Type and Priority fields and a "Powered by Uptimia" footer.
When several monitors sharing an escalation policy fail together, Discord receives one digest naming all of them rather than one message per monitor. As more monitors join, Uptimia adds updates to that digest at a limited rate. The digest carries an Acknowledge incident link that pauses the escalation ladder without signing in. See Alert Groups.
If Alerts Don't Arrive
- Check the monitor's alerting mode. Open the monitor's Alerting card and read the mode. If it reads Escalate over time, the Discord contact must appear in a step of the attached policy. If it reads All at once, confirm the contact is selected, directly or through a group row that includes it.
- Check the account email is verified. An unverified account email drops every queued alert on every channel, while integration tests keep passing.
- Read the right pane of the recipients panel. A recipient carrying a won't deliver badge is unconfirmed, opted out, or duplicates another selected contact on the same destination. Hover the badge to see which. See Who Gets Alerted.
- Confirm the incident exists. Open the monitor's Incidents card. No incident means nothing was sent.
- Re-copy the webhook URL. Deleting or recreating a channel or webhook in Discord invalidates the old URL. Paste the new one into Webhook URL, save, and test again.
If the confirmation never appears in the channel, or it appears but real alerts do not, contact support. Give them the integration name, the affected monitor and the incident timestamp. Support can then trace the delivery log for that alert.